Ingredient Ideology | The Healthy Tempeh For Good Health By: Dr. Kaviraj Khialani- Celebrity Master Chef.

The word Tempeh comes from Indonesia and has been known for quite some time however most of us have not yet tried and incorporated it into our favorite recipes in our kitchens, it is very obvious to have a doubtful thought process on the how’s? what’s? and what if not? when it comes to trying something new. The same thing happened with me as well when I found myself acquainted to tempeh but once it turned out to be a delight and burst of flavors in the form of a recipe it has now become an anytime welcome with a number of ways doing it and that is how this feature of sharing more about tempeh started.

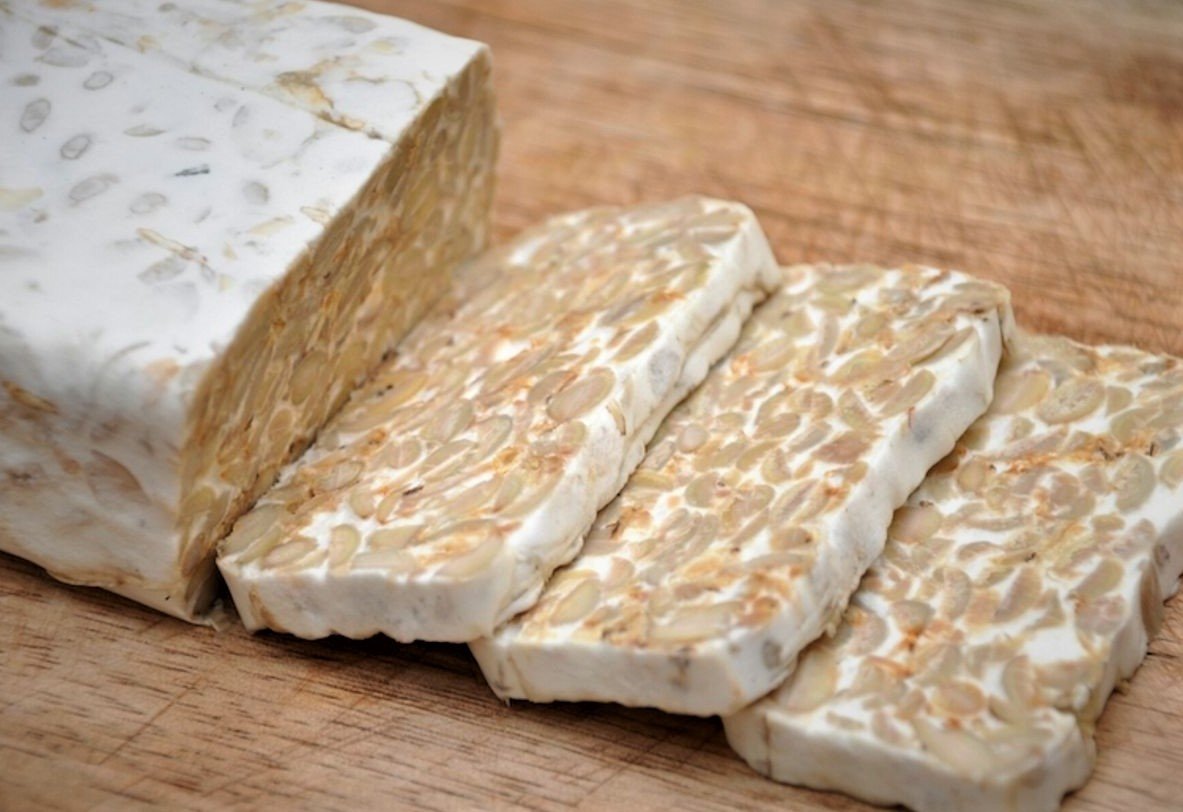
Tempeh is actually a meatless source of rich protein, vegan in nature, healthy and nutritious for those who love plant based foods and enjoy experimenting with recipes which are not only colorful to the eyes but also tempting to the palate. Tempeh is made from fermented soy beans which are broken down by micro-organisms and is further compacted and pressed into cakes which have a nice texture, appealing color and a little chewy in texture with a little nutty in its taste.

Most tempeh in Indonesia is sold wrapped in banana leaves and are available in local markets, though in the united states and other places we have seen it being available in vacuum packed formats. Besides being packed and being a power house of proteins and nutrients tempeh is also a good source of essential vitamins and minerals but are a bit low in sodium and carbohydrate content.

“Tempeh is a wonderful vegetarian offering which can be used in a number of recipes from snacks to soups, main course to side dishes, a must try ingredient by all foodies to relish its flavors”! - Dr. Kaviraj Khialani- Celebrity Master Chef.


Health Benefits of Tempeh:

1. Tempeh is good to include in our diet since it is good for weight management and is an interesting option to add.

2. Tempeh also is known to aid in digestion in our body therefore it somehow plays an important role.

3. Tempeh is said to reduce inflammation in the body.

4. Tempeh is loaded with pro-biotics which is also good.

5. Tempeh is also a good source of fiber besides proteins.

6. Tempeh is also regarded as a heart-healthy & brain-healthy food.

7. Tempeh is said to reduce cholesterol levels in our body.


Culinary Uses of Tempeh in our Kitchens:

1. Tempeh being a soy based product is very much easy to adapt to into our very own indian cuisine. It can formulate itself into gravies, curries, crumbled up and stuffed into tikkis and more.

2. Tempeh is a good option to use in salads as it is also regarded good for weight loss it gives us a variety to make our salads more interesting and colorful as well. Combine it with various greens and crunchy ingredients and a choice of flavorful dressings.

3. Tempeh is a great filler for sandwiches, wraps and roll concepts as well and can create a great mouth feel in between those two slices of assorted breads from vegan breads, almond meal breads, multi-grain breads, rye bread, herbed rolls etc with a variety of lettuce leaves and superfoods like avocados, tomatoes and a dash of herbs and seasonings.

4. Tempeh is also found in the popular Buddha bowl concept which is now featuring itself in many menu cards in Asian cuisine restaurants it is not only filling but has a number of elements to enjoy all in one bowl with a little bit of everything which makes it a complete one pot meal in itself.

5. Tempeh in soups and broths is also one of the better ways to incorporate it into suppers and light meals once in a while. Have a nice flavorful stock and a few veggies of your choice in it and with tempeh and a little seasoning and sauces it is ideal to enjoy a good bowl of nutri-balance.

6. Tempeh is also great to add to stir fry concepts and recipes.it is a good match to a number of exotic veggies like mushrooms, broccoli, zucchini, bell peppers, asparagus etc and with a little bit of celery, garlic, spring onions and stir fry sauce and a dash of chili and pepper it is good to go with.

7. Tempeh in baked dishes creates variety in our meals as well. Steam the cut tempeh pieces for around 10 mins and then marinate it with a choice of ingredients and sauces and place it into a baking dish with add ons and alternates to enhance the dish. Create layers in the baked dish with choice of plant based options and with some vegan cheese etc.


Here are a few Simple- Easy & Healthy Recipes with Tempeh:

Recipe-1] TEMPEH SOUP

Ingredients:

Tempeh- 150 gms cut into cubes.

Veg stock- 500- 750 ml

Oil- 2 tbsp.

Salt and pepper to taste

Chili flakes- ½ tsp

Soy sauce- 1 tsp

Red chili sauce- 1 tsp

Garlic- 2-3 cloves, chopped

Onion-1 small, chopped.

Carrots- ¼ cup cut into cubes.

Celery- 2 tbsp. chopped

Mixed herbs/ fresh basil leaves- 2 tbsp.

Bayleaf-1 no

Green/yellow zucchini-1/2 cup cut into cubes.

Fresh parsley/micro-greens to garnish the soup- 2 tsp.


Method:

1. Heat 1 tbsp. oil in a sauce pan and add in the pieces of tempeh and saute it for a couple of minutes until golden browned, remove and keep aside.

2. In the same saucepan add in a little more oil and add in the Bayleaf, garlic, onion, celery, carrots and cook for 1-2 mins, add in the seasonings, herbs and chili flakes, sauces to taste.

3. Bring to a boil and add in the zucchini cut into med cubes and also add in the tempeh pieces, simmer for 10-12 mins until all veggies are just done right in texture.

4. Serve hot garnished with fresh herbs, micro-greens and a dash of crushed black pepper.

Recipe-2] TEMPEH KA DESI TADKA

Ingredients:

Tempeh- 150 gms cut into cubes.

For the marination:

Curd -1 cup

Lime juice-2 tsp

Cumin powder-1/2 tsp

Ginger-garlic paste-1 tsp

Garam masala powder-1/2 tsp

Salt to taste

Kasuri methi-1 tsp

Oil-1 tbsp.

Red chili powder-1/2 tsp.

For the sauce/gravy:

Oil-2 tbsp.

Onion- 2 medium chopped

Ginger-garlic-green chili paste-1 tsp

Red chili powder-1/2 tsp

Salt to taste

Turmeric powder-1/2 tsp

Tomato puree-1/4 cup

Coconut milk-1 cup

Green peas- ½ cup boiled

Coriander leaves- 2 tbsp. chopped

Method:

1. In a mixing bowl combine together the ingredients for the marination, add in the cut cubes of tempeh into the same and mix well, keep in the fridge for 45 mins.

2. Heat oil in a pan add in the onions, and ginger-garlic-chili paste and saute them all well around 3-4 mins, add a little water if needed. Add in the powdered spices and salt and mix them all well.

3. Add in tomato puree, the marinated tempeh and stir well. Now also add in the coconut milk and green peas and mix well. Simmer and allow to cook for 20 mins.

4. Serve hot garnished with fresh coriander leaves.


Recipe-3] STIR FRIED TEMPEH

Ingredients

Tempeh- 150 gms cut into cubes/fingers

Oil- 2 tbsp.

Ginger- 1 tsp chopped

Garlic- 1 tsp chopped

Green chili & red chilies- 2-3 each slit

Spring onions- 3-4 sliced

Red/green/yellow capsicums-1/2 cup cubes

Salt and pepper to taste

Red chili sauce-2 tsp

Soy sauce- 2 tsp

Sugar-1/2 tsp

Tomato ketchup-1 tbsp.

White sesame seeds- 1 tsp

White vinegar-1 tsp

Veg stock/water-1 cup

Corn flour and water solution-2 tbsp. to thicken up.

Spring onion greens-2 tbsp. chopped.

Method:

1. Cut the tempeh into cubes/fingers as desired and heat oil in a pan and slightly saute the tempeh for a couple of minutes, once slightly browned remove and keep aside.

2. In the same pan and a little more oil saute the ginger, garlic, chilies, onions and add in a little stock or water to prevent burning and to have a little sauce being formed.

3. Add in the salt, pepper, sauces to taste and bring it all to a boil, add in the peppers and the saute tempeh and allow to simmer for 2 mins.

4. Now add in the corn flour water solution and thicken the gravy and get it to a nice coating texture on the tempeh, check for seasonings, add in the vinegar and finally garnish with toasted white sesame seeds, the spring onion greens and serve hot as a snack/starter.

Recipe-4] TEMPEH SANDWICH

Ingredients

Tempeh-150 gms cut into slices

For the marination of tempeh:

Mustard paste-1 tsp

Olive oil-2-3 tbsp.

White vinegar/ balsamic vinegar- 2 tsp

Honey- 1 tbsp.

Peanut butter-2 tsp

Mixed herbs-1/2 tsp

Chili flakes-1/2 tsp

Soy sauce- 2 tsp

Red chili sauce- 2 tsp

 Sliced bread of your choice- 4-6 no.

Spread of your choice on the bread- mayo-mustard, cream cheese- herb spread, almond and mint butter, peanut butter and honey spread etc.

For the additions in the sandwich:

Assorted lettuce leaves- ½ cup fresh and crispy

Sliced tomatoes- 3-4 slices

Sliced cucumber- 4-5 sliced

Avocado slices- 4-5 no

Salt and crushed black pepper to taste

Vegan cheese/ cheese- as desired.

Accompany the sandwich with olives, pickled vegetables/chips etc.

Method:

1. Assemble all the ingredients for the sandwich with tempeh.

2. Steam the tempeh slices for 10 mins and remove, apply the marination and keep aside for 30 mins.

3. Heat 1 tbsp. oil on a grill pan/ non-stick pan and saute/grill the marinated tempeh for 2 mins on each side, remove and keep aside.

4. Arrange the slightly toasted slices of bread, apply the spread of your choice from simple butter to the varieties and place the lettuce leaves, tomato slices, cucumber slices, avocado etc add a little seasoning as needed.

5. Finally place the tempeh and close the sandwich and grill/ toast the sandwich as desired and serve hot with assorted dips and chips etc.


Ingredient Ideology | Ways with Vermicelli By: Dr. Kaviraj Khialani- Celebrity Master Chef.

Easy to Make & Amazing to Cherish Vermicelli Recipes

Vermicelli is a traditional type of pasta round in a section similar to spaghetti. In English-speaking regions, it is usually thinner than spaghetti, while in Italy it is typically thicker. The term vermicelli is also used to describe various types of thin noodles from Asia. Out of the various ingredients used for making upma and payasam, the Vermicelli, also known as Semiya (in Tamil), Seviyan (Hindi), and Shemai (Bengali), finds a special mention. It is popular in several Indian states and is most commonly used for preparing a sweet preparation similar to kheer. 

Also to note that as vermicelli is a high-calorie food rich in simple carbohydrates, it is not a good meal option for weight loss. Vermicelli/ Sevai/ Semiya which is made from Sooji and no Maida i.e. refined wheat flour. Vermicelli is an effortless, healthy, and wholesome breakfast recipe. It's high in fiber and low in calories too these days by some brands and companies.

Nutritionally vermicelli is calorie-dense high in carbs, fat, and cholesterol free low in sodium. A great alternative to other forms of pasta and oats liked by all irrespective of age. Breakfast prepared with vermicelli is incredibly delicious which is also good for toddlers and pregnant women. The extra fiber in brown rice means it is a bit lower on the glycemic index (GI), with a score of 50—compared to 72 for white rice. Rice vermicelli scores 58 on the glycemic index, so it's in between these scores. Rice noodles are also called rice sticks, vermicelli, and other variations of these words. The noodles are naturally gluten-free with a typical ingredient list of rice flour and water. Vermicelli actually refers to the width of the noodle rather than the flour it is made of.

Here are a few easy-to-make yet delicious concoctions to try out this festive season!

Recipe-1] DILKHUSH NUTKHUT VERMICELLI

Ingredients:

Seviyan- ½ packet/ 1 and a half cup, semi-roasted

Ghee-1 tsp

Sugar- 1 cup or as per taste

Honey-2-3 tsp

Green cardamom powder-1/4 tsp

Cashew powder-1 tsp

Almond powder-1 tsp

Raisins- 2 tsp, chopped

Milk-750 ml or as needed

Mava – 100 gms, grated

Condensed milk- ¼ cup

Method:

1. prepare all the ingredients as per the recipe sheet and as per the quantities given in above.

2. using a thick-bottomed pan, add ghee, seviyan, sugar and start roasting it all lightly on a low to medium flame, add in the milk and stir well.

3. reduce the flame and stir well ensuring there are no lumps in the pan. Add in some of the nuts and mix well, simmer and allow to cook for 6- 8 mins.

4. add in mava, and condensed milk and stir well. Check for sugar as per taste and add more if needed. Add honey and mix well. Cook for another 3-4 mins and turn off the flame.

5. portion out the sweet in a serving dish or in individual bowls, dessert cups and garnish it well with nuts, dried rose petals etc and raisins, dates etc can also be used to adorn the sweet. At times I also use dark chocolate garnishes or shavings as well on the chilled dessert as an option.


Recipe-2] VERMICELLI KHEER SHORTS

Ingredients:

Ghee-1 tsp

Vermicelli- 1 and a half cup, semi roasted

Sugar- 1 cup or as needed

Milk-750 ml or as needed

Green cardamom powder-1/4 tsp

Mava- 1 tbsp. grated

Condensed milk-2-3 tsp

Chopped nuts-2-3 tsp

To layer in the glasses later for serving:

Rabdi- 1 and a half cup

Assorted fresh fruits- 1 cup

Glazed cherries- 1-2 tsp sliced

Rose syrup/ khus syrup-1-2 tsp

Method:

1. Prepare all the ingredients for the sweet recipe as per the list above.

2. To start with the cooking of the sweet, heat ghee in a thick-bottomed pan, add in ghee add vermicelli, and sugar, and stir well, lightly saute add in the green cardamom powder, add in milk and give it all a nice stir.

3. allow the sweet to simmer and cook for around 10-12 mins, now add in the nuts and also cook it further for 3-4 mins on low flame. The texture of the sweet needs to be a little thick and creamy therefore a little condensed milk may be added too.

4. check the sweetness and overall balance in the recipe and then choose to turn it off. Allow the sweet to cool down and chill for 30-45 mins.

5. now to start the layering of the sweet, choose between sweet glasses, cups, pudding bowls etc and place a little of the seviyan sweet at the base and then layer with fresh fruits, rabdi, nuts and add some cherries, tooti frooti etc to add some crunch and color.

6. allow the glasses to chill in the fridge for around 30- 45 mins and then serve the dessert.

Recipe-3] FUSION FUNDA WALI VERMICELLI

Ingredients:

Butter-1 tsp

Ghee-1 tsp

Brown sugar-1/2 cup

White sugar-1/2 cup

Seviyan-1 and a half cup

White chocolate-1/2 cup melted

Dark chocolate -1/2 cup melted

Milk- 750 ml

Green cardamom powder/ cinnamon powder-1 pinch

Angoori Gulab jamuns- 10-12 pieces

Angoori rasmalai- 10-12 pieces

Cashews-2 tsp chopped

Raisins-2 tsp chopped

Walnuts-2 tbsp. chopped

Dates-2 tbsp. chopped

Rose water-2 tsp

Praline- ¼ cup crushed/ chikki

Rose petals- ½ cup optional for garnish

Edible varq- 1-2 pieces for garnish.

Method:

1. prepare all the ingredients for the sweet as listed above and keep ready.

2. to start preparing the sweet using a thick-bottomed pan, add ghee and butter and saute the vermicelli for a few seconds, add in the white and brown sugar, and some green cardamom or cinnamon powder for flavor.

3. add in the milk and chopped dates and allow to simmer and cook. Once the seviyan starts cooking we need to check on the texture of the sweet to ensure that the thickness, sweetness, and overall balance is maintained.

4. once the seviyan starts thickening the sweet, turn off the flame and allow to cool. Now start with the fusion aspect of coating the ras malai with dark chocolate and the jamuns with white chocolate, once coated, allow to set in the fridge for some time.

5. now start with the assembling of the sweets, use dessert cups, short glasses, pudding bowls, start with the kheer first and then layer the set chocolate goodies, cover with a little more seviyan mixture, and then garnish with nuts, petals, and garnishes as desired.

6. chill the dessert for another 30-45 mins before serving it out. The chilling in the fridge adds a lot of dimension and texture as well to the sweet dish.

Recipe- 4] KHAJOOR WALI MEETHI VERMICELLI

Ingredients:

Ghee-1 tsp

Oil-1 tsp

Honey-1 tbsp.

Seviyan- 1 and a half cup

Green cardamom powder-1/4 tsp

Sugar- ½ cup white

Jaggery-1/2 cup grated

Milk- 750 ml

Mava- 50 gms grated.

Condensed milk-1/4 cup

Assorted chopped nuts- 2 tbsp. cashews, walnuts, raisins.

Date puree-1/2 cup

Melted dark chocolate/ choco chips- ¼ cup

Method:

1. prepare all the ingredients for the recipe as listed above and keep ready.

2. to start with the cooking of the sweet dish, we need to take a thick-bottomed pan, add in the ghee, oil etc and start the roasting process of the seviyan add elaichi powder, and sugar to taste and stir well.

3. add in the milk and allow to come to a boil, once the sweet starts to cook, it starts thickening add in the jaggery and mix well. Add some honey and condensed milk as well to get the right sweetness.

4. simmer and allow to cook for 10-12 mins, check for sweetness, and texture and get the right balance in the sweetness. It is important to taste the sweet while being cooked so that there is no overpowering. Also we must ensure that the sweet doesn’t stick at the base.

5. turn off and allow to cool and chill the sweet, add nits to garnish the sweet dish. This dessert turns out the best when well chilled, add chocolate sauce/chips and some fresh fruits as well like strawberries/ kiwi/ dragon fruit etc to add a little variety in the look and presentation.

Recipe- 5] KHUSH MIJAZ VERMICELLI

Ingredients:

Ghee- 1 tsp

Butter-1 tsp

Seviyan -1 and a half cup

White sugar- ½ cup

Condensed milk-1/4 cup

Green cardamom powder-1/4 tsp

Saffron-1/4 tsp soaked in ½ cup warm milk

Chopped cashews- 2 tsp

Raisins-2 tsp chopped

Almonds-2 tsp chopped

Dates-2 tsp chopped

Milk- 750 ml

Kesari pedha- 50 gms

Rabdi-1 cup

Method:

1. prepare all the ingredients for the sweet recipe and keep aside.

2. to start the cooking process take a thick-bottomed pan and add in ghee/butter add in the vermicelli, sugar, and elaichi, and saute well for a few seconds.

3. add in the milk and condensed milk and give it a nice mix. Allow to simmer for 10-12 mins. Check for the sweetness and adjust it accordingly.

4. once the sweet starts getting thick, add in the roughly crumbled kesari pedha and dates and mix well. Turn off the flame and allow it to cool.

5. set the sweet in small dessert cups/bowls etc. and allow to set in the fridge for 30-45 mins. Add nuts for garnish and relish the sweet. For some more added fusion touch to it, try adding a jalebi injected with rum, flamed, and place it on the top and enjoy it.

Ingredient Ideology | A Melange Of Desi Flavors To Offer This Festive Season, By: Dr. Kaviraj Khialani- Celebrity Master Chef

It’s Festivity Time- Ganapati Bappa Morya!

We are finally at that part of the year when the festivity has just begun! With the onset of the auspicious occasion of Lord Ganesh Festival, we are now looking up to a series of occasions to celebrate, have an array of spreads and sweet treats to entice our palate and offer blessed delicacies to our loved ones, friends & families. Food has always been an integral part of any festival and it somehow connects us together and spreading the joy of happiness and bites of delicious preparations adds it up all the more, making it memorable.

Sweets & mithai are always a temptation but moderation being the key to balance must be always kept in mind. Planning is of vital importance when it comes to festive cooking and especially with sweets, it is always a good idea to make a list of ingredients needed, approximate quantities required, any special unusual product/ equipment etc needed or so must be on the reminder list before we start getting into the kitchen to get things rolling. Also another important element to perfection here is to follow the recipe and do not always go with just guessing and approximation since some of the sweet recipes need formula balancing as we technically call it.

Here are a few of my favorite sweets, easy to make in your kitchens and offer it to the almighty and loved ones!

Recipe-1] MODAK KA PRASHAD

Ingredients:

For the covering of the modak:

Water-2 cups

Salt-1/2 tsp

Rice flour-2 cups

1-2 tsp ghee

For the stuffing of the modak:

Ghee-1-2 tsp

Coconut- grated-2 cups

Jaggery-1 cup, grated

Green cardamom powder-1/2 tsp

Method:

1. In a thick bottomed pan or kadai firstly prepare the stuffing for the modak prashad.

2. Add ghee to the pan and place in the grated coconut and on a medium to low flame keep sautéing the coconut until it gets nice and aromatic.

3. Now add in the grated jaggery and give It a nice mix, stir it well until the jaggery melts down well into the coconut and flavors it well, finally add the cardamom powder, mix and keep aside.

4. Now let us prepare the covering for the modak, heat up water, salt, ghee in a pan, add in the rice flour and give it a nice mix for a minute or so, cook until the water is all well absorbed, cover and turn off the flame, rest for 3-5 mins.

5. Now knead the mixture by placing it in a large steel bowl and convert it into a dough and use a little wet hand if it feels dry.

6. To shape up the modak, divide the prepared dough mix into small portions, flatten slightly place the coconut filling in the center and start sealing either with hands or using a modak mould.

7. To steam the modak, prepare a steamer with water simmering in it. Place the prepared modak on the racks and continue to steam for 10-12 mins, or until they all look brighter and shiny in texture, carefully take them out of the steamer, arrange on a serving platter and offer to the lord first.


Recipe-2] KESARI BADAMI SHRIKHAND

Ingredients:

Curd- 1 cup

Powder sugar- 4-5 tbsp.

Warm water-1-2 tsp

Saffron strands- 4-6 no

Almonds-2 tsp chopped

Cashews-2 tsp chopped

Cardamom powder-1/4 tsp

Charoli/ assorted nuts as needed for garnish.

Method:

1. Firstly, place a sieve in a large bowl. Place a muslin cloth on it. Transfer the curd on the cloth and tie it. Keep it in the refrigerator for 2-3 hrs or overnight. So that all the water is removed from the curd. Add saffron strands to 1 tsp of warm water and keep aside.

2. Now transfer the hung curd to the sieve and add powder sugar to it. Sieve the curd and sugar. Now add saffron water to the curd and mix everything well. Add cardamom powder and chopped almonds to it and mix well.

3. Lastly, transfer the shrikhand to a serving bowl and garnish with some more chopped almonds and a pinch of cardamom powder. 

Note -
1. Make sure to use fresh thick curd, to have rich quality shrikhand.
2. The amount of sugar depends on the sourness of the curd. Do not use too sour curd for shrikhand.

Recipe- 3] MAAVEDAAR HALWA

Ingredients:

Carrots- 500 gms, peeled, grated

Ghee-1/4 cup

Green cardamom powder-1/4 tsp

Sugar-1 cup or as per taste

Mava/ khoya-1/2 cup

Cashews-2 tsp chopped

Almonds-2 tsp chopped

Raisins-2 tsp 

Milk- 600 ml

Method

1.Firstly, peel the skin of carrot and grate finely. keep aside. Traditionally the winter carrots are used to prepare halwa during winter seasons.

2. In a large kadai heat ¼ cup ghee and fry the assorted nuts like cashews, raisins, almonds etc. Fry until it turns golden brown. keep aside.

3. In the same ghee add grated carrot and saute well. Saute for 5 minutes or until it changes colour slightly.

4.Now pour 3 cup milk and give a good stir, boil for 10 minutes stirring occasionally, continue to boil until the carrots are cooked well and milk reduces.

5. Once the milk starts to thicken a little, add ¾ cup sugar. Mix well and cook until the sugar dissolves and thickens. Cook until the halwa thickens and ghee releases from sides.

6.Finally turn off the flame and ½ cup mava/ grated khoya, ¼ tsp cardamom powder and fried nuts.mix well making sure everything is well combined. Finally, enjoy gajar ka halwa or carrot halwa chilled or warm

Ingredient Ideology | Snacky Affair With Croquettes By: Dr. Kaviraj Khialani- Celebrity Master Chef

SNACKY AFFAIR WITH CROQUETTES!

The croquette originated in France and it was in 1898 that Monsieur Escoffier, the founder of the classical French Cuisine, together with the help of Monsieur Phileas Gilbert started to write down the recipe.  The word croquette is French, derived from croquer, meaning 'to crunch'. A croquette is a type of dumpling consisting of a thick binder combined with a filling, which is breaded and deep-fried; it is served as a side dish, a snack, or fast food worldwide. The binder is typically a thick béchamel or brown sauce, mashed potatoes, wheat flour or wheat bread. 

The Origin of the Croquette- A croquette is a small cylinder or ball of filling that has been breaded and fried. Auguste Escoffier, a French culinary artist, created the modern form of these bundles of joy in France in 1898. Croquettes are a heavenly invention– especially ham croquettes in Spain. But the Spanish aren't the only people to make these delicious fried goodies. Croquettes are simply a bread crumbed and fried roll of food leftovers, usually bound with Bechamel sauce or mashed potatoes. 

One of the most popular Spanish tapas (food bites one eats while drinking), croquettes are also a staple in Spanish cuisine, often served as a light lunch or dinner with a salad. These little bites may easily be called the ultimate comfort food; they are delicious, crunchy, salty, and crispy. To prevent the croquettes from exploding during cooking, it is important that they are completely submerged and that the oil temperature is as specified. You can fry them in sunflower oil if you prefer and some also believe that Croquettes can be frozen for 1 month if stored well.

Chicken Croquettes are filled with panko, chopped red and green bell peppers, cooked chicken, creamy mayonnaise, seasoned with garlic powder and mixed together into small rounds. These are easy to make! These are perfect for a light dinner, easy appetizer or a quick snack! Place a cube of cheese in the middle and wrap the mashed potato around it. Shape into a cylinder shape. Dip the croquette into the flour, then into the egg and finally into the breadcrumbs, ensuring the croquette is completely covered. Place on the baking tray and repeat with the rest of the mashed potato.

Here are a few easy-to-make varieties of croquettes to try out and relish:

Recipe-1] CHEESY CHICKEN CROQUETTES

Ingredients:

Oil- 2 tsp

Butter-1 tsp

Refined flour-2 tsp

Garlic-1 tsp chopped

Onion-1 small chopped

Green chilies-1 tsp chopped optional

Salt to taste

Black pepper powder to taste

Mixed herbs-1/2 tsp

Chili flakes-1/4 tsp optional

Milk-1/2 cup

White sauce-1/2 cup

Boiled chopped chicken-1 cup

Mashed potato-1 cup

Grated cheese-2-3 tbsp.

Bread crumbs- ½ cup for binding + as needed for coating

Cornflour/ maida- 2-3 tsp as needed for binding + as needed for the batter to dip in the croquettes.

Oil- as needed to deep fry the croquettes.

To serve the croquettes:

Tomato ketchup / chili sauce/ mayonnaise / dips we desired.


Method:

1. Prepare all the ingredients as needed for the croquette recipe.

2. Heat oil and butter in a pan, add in the flour and cook for 15 seconds using a whisk add in garlic and onions saute them for a few seconds, add in some veg stock/ water and little milk and mix well.

3. Now add in the seasonings, herbs, chili flakes, green chilies if desired. Add in the boiled chopped chicken pieces, mix well.

4. Add in the grated cheese and turn off the flame. Add in the mashed potatoes and little maida, cornflour powder and combine it all well to form a dough like texture in the pan, the sides need to be coming out clean as we mix it all well.

5. Remove the mixture onto a greased plate, allow to cool for a few seconds. Apply little oil on the fingers and start dividing the mixture into equal small portions, shape them into a cylindrical pattern and press and bind well.

6. Chill the croquettes in the fridge for around 20 mins, remove and dip in a coating thick batter of maida/ corn flour and water followed by a coating of bread crumbs, pat them well and remove excess crumbs. Allow the croquettes to chill one more time for 10-12 mins.

7. Heat up oil to deep fry in the meantime and on a medium high flame we can start frying the prepared croquettes to a nice golden brown color, remove onto a kitchen paper/ tissue and drain off the excess oil.

8. Arrange the fried chicken croquettes on a serving plate or platter and offer the dips and sauces to go alongside.

Recipe-2] DESI ALOO PEPPER TADKA CROQUETTES

Ingredients:

Oil- 2 tsp

Butter-1 tsp

Refined flour-2 tsp

Garlic-1 tsp chopped

Onion-1 small chopped

Green chilies-1 tsp chopped optional

Ginger-1 tsp chopped

Cumin seeds-1/2 tsp

Curry leaves- 5-6 no

Salt to taste

Black pepper powder to taste

Mixed herbs-1/2 tsp

Chili flakes-1/4 tsp optional

Milk-1/2 cup

White sauce-1/2 cup

Mashed potato-1 cup

Grated cheese-2-3 tbsp.

Bread crumbs- ½ cup for binding + as needed for coating

Cornflour/ maida- 2-3 tsp as needed for binding + as needed for the batter to dip in the croquettes.

Oil- as needed to deep fry the croquettes.

To serve the croquettes:

Tomato ketchup / chili sauce/ mayonnaise / dips we desired.

Method:

1. Prepare all the ingredients as needed for the croquette recipe.

2. Heat oil and butter in a pan, add in the flour and cook for 15 seconds using a whisk add in garlic, ginger, cumin and curry leaves and onions saute them for a few seconds, add in some veg stock/ water and little milk and mix well.

3. Now add in the seasonings, herbs, chili flakes, green chilies if desired. Add in the boiled mashed veggies, mix well.

4. Add in the grated cheese and turn off the flame. Add in the mashed potatoes and little maida, cornflour powder and combine it all well to form a dough like texture in the pan, the sides need to be coming out clean as we mix it all well.

5. Remove the mixture onto a greased plate, allow to cool for a few seconds. Apply little oil on the fingers and start dividing the mixture into equal small portions, shape them into a cylindrical pattern and press and bind well.

6. Chill the croquettes in the fridge for around 20 mins, remove and dip in a coating thick batter of maida/ corn flour and water followed by a coating of bread crumbs, pat them well and remove excess crumbs. Allow the croquettes to chill one more time for 10-12 mins.

7. Heat up oil to deep fry in the meantime and on a medium high flame we can start frying the prepared croquettes to a nice golden brown color, remove onto a kitchen paper/ tissue and drain off the excess oil.

8. Arrange the fried chicken croquettes on a serving plate or platter and offer the dips and sauces to go alongside.


Recipe-3] FISH AND DILL CROQUETTES

Ingredients:

Oil- 2 tsp

Butter-1 tsp

Boneless fish fillets- 400 gms

Refined flour-2 tsp

Garlic-1 tsp chopped

Onion-1 small chopped

Green chilies-1 tsp chopped optional

Salt to taste

Black pepper powder to taste

Mixed herbs-1/2 tsp

Fresh dill leaves- 2 tsp chopped

Chili flakes-1/4 tsp optional

Fish stock -1/4 cup

Fish veloute sauce-1/2 cup thickened

Mashed potato-1 cup

Grated cheese-2-3 tbsp.

Bread crumbs- ½ cup for binding + as needed for coating

Cornflour/ maida- 2-3 tsp as needed for binding + as needed for the batter to dip in the croquettes.

Oil- as needed to deep fry the croquettes.

To serve the croquettes:

Tomato ketchup / chili sauce/ mayonnaise / dips we desired.

Method:

1. Prepare all the ingredients as needed for the croquette recipe.

2. Heat oil and butter in a pan, add in the flour and cook for 15 seconds using a whisk add in garlic and onions saute them for a few seconds, add in some fish stock/ water and little fish veloute and mix well.

3. Now add in the seasonings, herbs, chili flakes, green chilies if desired. Add in the poached fish pieces, mix well and using a fork break it down into the mixture.

4. Add in the grated cheese and turn off the flame. Add in the mashed potatoes, dill leaves and little maida, cornflour powder and combine it all well to form a dough like texture in the pan, the sides need to be coming out clean as we mix it all well.

5. Remove the mixture onto a greased plate, allow to cool for a few seconds. Apply little oil on the fingers and start dividing the mixture into equal small portions, shape them into a cylindrical pattern and press and bind well.

6. Chill the croquettes in the fridge for around 20 mins, remove and dip in a coating thick batter of maida/ corn flour and water followed by a coating of bread crumbs, pat them well and remove excess crumbs. Allow the croquettes to chill one more time for 10-12 mins.

7. Heat up oil to deep fry in the meantime and on a medium high flame we can start frying the prepared croquettes to a nice golden brown color, remove onto a kitchen paper/ tissue and drain off the excess oil.

8. Arrange the fried chicken croquettes on a serving plate or platter and offer the dips and sauces to go alongside.


Recipe-4] LENTIL OLIVE CROQUETTES

Ingredients:

Oil- 2 tsp

Butter-1 tsp

Boiled yellow lentils- ½ cup thick mixture

Refined flour-2 tsp

Garlic-1 tsp chopped

Onion-1 small chopped

Green chilies-1 tsp chopped optional

Salt to taste

Black pepper powder to taste

Mixed herbs-1/2 tsp

Black olives- 2-3 tsp chopped

Fresh parsley leaves- 2 tsp chopped

Chili flakes-1/4 tsp optional

veg stock -1/4 cup

Bechamel sauce-1/2 cup thickened

Mashed potato-1 cup

Grated cheese-2-3 tbsp.

Bread crumbs- ½ cup for binding + as needed for coating

Cornflour/ maida- 2-3 tsp as needed for binding + as needed for the batter to dip in the croquettes.

Oil- as needed to deep fry the croquettes.

To serve the croquettes:

Tomato ketchup / chili sauce/ mayonnaise / dips we desired.

Method:

1. Prepare all the ingredients as needed for the croquette recipe.

2. Heat oil and butter in a pan, add in the flour and cook for 15 seconds using a whisk add in garlic and onions saute them for a few seconds, add in some veg stock/ water and little béchamel and mix well. 

3. Now add in the seasonings, herbs, chili flakes, green chilies if desired. Add in the thick lentil mixture, mix well and add in the sliced black olives as well.

4. Add in the grated cheese and turn off the flame. Add in the mashed potatoes, chopped parsley leaves and little maida, cornflour powder and combine it all well to form a dough like texture in the pan, the sides need to be coming out clean as we mix it all well.

5. Remove the mixture onto a greased plate, allow to cool for a few seconds. Apply little oil on the fingers and start dividing the mixture into equal small portions, shape them into a cylindrical pattern and press and bind well.

6. Chill the croquettes in the fridge for around 20 mins, remove and dip in a coating thick batter of maida/ corn flour and water followed by a coating of bread crumbs, pat them well and remove excess crumbs. Allow the croquettes to chill one more time for 10-12 mins.

7. Heat up oil to deep fry in the meantime and on a medium high flame we can start frying the prepared croquettes to a nice golden brown color, remove onto a kitchen paper/ tissue and drain off the excess oil.

8. Arrange the fried chicken croquettes on a serving plate or platter and offer the dips and sauces to go alongside.


Recipe- 5] MAC- N- CHEESE CROQUETTES

Ingredients:

Oil- 2 tsp

Butter-1 tsp

Boiled macaroni pasta- 1 and a half cup

Refined flour-2 tsp

Garlic-1 tsp chopped

Onion-1 small chopped

Green chilies-1 tsp chopped optional

Salt to taste

Black pepper powder to taste

Mixed herbs-1/2 tsp

Black olives- 2-3 tsp chopped

Fresh parsley leaves- 2 tsp chopped

Chili flakes-1/4 tsp optional

veg stock -1/4 cup

Bechamel sauce-1/2 cup thickened

Mashed potato-1/4 cup

Boiled chopped eggs-1 -2 no

Grated cheese-2-3 tbsp.

Bread crumbs- ½ cup for binding + as needed for coating

Cornflour/ maida- 2-3 tsp as needed for binding + as needed for the batter to dip in the croquettes.

Oil- as needed to deep fry the croquettes.

To serve the croquettes:

Tomato ketchup/chili sauce/mayonnaise/dips we desired.

Method:

1. Prepare all the ingredients as needed for the croquette recipe.

2. Heat oil and butter in a pan, add in the flour and cook for 15 seconds using a whisk add in garlic and onions saute them for a few seconds, add in some veg stock/ water and little béchamel and mix well. 

3. Now add in the seasonings, herbs, chili flakes, green chilies if desired. Add in the macaroni pasta mix well and add in the chopped eggs as well.

4. Add in the grated cheese and turn off the flame. Add in the mashed potatoes, chopped parsley leaves and little maida, cornflour powder and combine it all well to form a dough like texture in the pan, the sides need to be coming out clean as we mix it all well.

5. Remove the mixture onto a greased plate, allow to cool for a few seconds. Apply little oil on the fingers and start dividing the mixture into equal small portions, shape them into a cylindrical pattern and press and bind well.

6. Chill the croquettes in the fridge for around 20 mins, remove and dip in a coating thick batter of maida/ corn flour and water followed by a coating of bread crumbs, pat them well and remove excess crumbs. Allow the croquettes to chill one more time for 10-12 mins.

7. Heat up oil to deep fry in the meantime and on a medium high flame we can start frying the prepared croquettes to a nice golden brown color, remove onto a kitchen paper/ tissue and drain off the excess oil.

8. Arrange the fried chicken croquettes on a serving plate or platter and offer the dips and sauces to go alongside.


Recipe-6] MIX VEGGIE HERBED CROQUETTES

Ingredients:

Oil- 2 tsp

Butter-1 tsp

Boiled carrots/ beans/ peas/ cauliflower- 1 and a half cup mix

Refined flour-2 tsp

Garlic-1 tsp chopped

Onion-1 small chopped

Green chilies-1 tsp chopped optional

Salt to taste

Black pepper powder to taste

Mixed herbs-1/2 tsp

green olives- 2-3 tsp chopped

Fresh parsley leaves- 2 tsp chopped

Jalapenos- 2-3 tsp chopped

Chili flakes-1/4 tsp optional

veg stock -1/4 cup

Bechamel sauce-1/2 cup thickened

Mashed potato-1/4 cup

Boiled chopped eggs-1 -2 no

Grated cheese-2-3 tbsp.

Bread crumbs- ½ cup for binding + as needed for coating

Cornflour/ maida- 2-3 tsp as needed for binding + as needed for the batter to dip in the croquettes.

Oil- as needed to deep fry the croquettes.

To serve the croquettes:

Tomato ketchup / chili sauce/ mayonnaise / dips we desired.

Method:

1. Prepare all the ingredients as needed for the croquette recipe.

2. Heat oil and butter in a pan, add in the flour and cook for 15 seconds using a whisk add in garlic and onions saute them for a few seconds, add in some veg stock/ water and little béchamel and mix well. 

3. Now add in the seasonings, herbs, chili flakes, green chilies if desired. Add in the boiled lightly mashed veggies mix well and add in the jalapenos and olives as well.

4. Add in the grated cheese and turn off the flame. Add in the mashed potatoes, chopped parsley leaves and little maida, cornflour powder and combine it all well to form a dough like texture in the pan, the sides need to be coming out clean as we mix it all well.

5. Remove the mixture onto a greased plate, allow to cool for a few seconds. Apply little oil on the fingers and start dividing the mixture into equal small portions, shape them into a cylindrical pattern and press and bind well.

6. Chill the croquettes in the fridge for around 20 mins, remove and dip in a coating thick batter of maida/ corn flour and water followed by a coating of bread crumbs, pat them well and remove excess crumbs. Allow the croquettes to chill one more time for 10-12 mins.

7. Heat up oil to deep fry in the meantime and on a medium high flame we can start frying the prepared croquettes to a nice golden brown color, remove onto a kitchen paper/ tissue and drain off the excess oil.

8. Arrange the fried chicken croquettes on a serving plate or platter and offer the dips and sauces to go alongside.

On a concluding note: the concept of croquettes is no doubt a part of continental cuisine and style but it can be a good option to try when it comes to innovative and or creative aspects being attached to it. A few of my works turned out amazing with this concept for instance some leftover chicken tikka, finely chopped in combination with some schezuan chutney, some mashed potato, fresh coriander all bound up together into a croquette fashion and served with a pesto mayo chutney is just so tempting to the palate! Let us all keep our vision beyond the horizon and experiment with food as much possible to entice the taste buds of not only our loved ones but also our valued guests and food connoisseurs

World Chocolate Day Recipes by Chef Deepak Kumar, Seven Eleven Club & Hotel

World Chocolate Day Recipes

Celebrate the sweetness that unites cultures and brings joy to people all around the globe on World Chocolate Day. Every year, on July 7th, chocolate enthusiasts and confectionery lovers come together to pay homage to this beloved treat. This special day allows us to appreciate the artistry and craftsmanship behind chocolate-making, while also savoring the delicious pleasures it offers. So, mark your calendar and join in the worldwide celebration of World Chocolate Day, where chocolate becomes a universal language that brings smiles and happiness to people from every corner of the world.

RECIPE - 1 - CLASSIC CHOCOLATE FONDANT 

Indulge your senses with the decadent delight of a Classic Chocolate Fondant. This luscious dessert is a perfect balance of rich, molten chocolate and a delicate, cake-like exterior. With its elegant presentation and irresistible taste, the Chocolate Fondant has become a staple in the realm of gourmet desserts. The mere thought of cutting into the warm, oozing center of this dessert is enough to make anyone's mouth water. Whether you're hosting a dinner party or simply craving a sweet indulgence, this timeless recipe is sure to impress both friends and family alike. Get ready to embark on a culinary journey that will satisfy your chocolate cravings and leave you with a lasting impression of divine chocolate bliss.

Ingredients:

  • 4 ounces (113 grams) of dark chocolate, chopped

  • 1/2 cup unsalted butter

  • 1 cup powdered sugar

  • 2 large eggs

  • 2 large egg yolks

  • 1/2 teaspoon vanilla extract

  • 1/4 cup all-purpose flour

  • Pinch of salt

  • Optional: cocoa powder or powdered sugar for dusting

Instructions:

  • Preheat your oven to 425°F (220°C). Grease and lightly flour individual ramekins or molds.

  • In a heatproof bowl, melt the dark chocolate and butter together over a pot of simmering water, stirring until smooth. Remove from heat and let it cool slightly.

  • In a separate bowl, whisk together the powdered sugar, eggs, egg yolks, and vanilla extract until well combined.

  • Gradually pour the egg mixture into the melted chocolate, whisking continuously.

  • Add the all-purpose flour and salt to the mixture, and gently fold until just combined. Be careful not to overmix.

  • Divide the batter evenly among the prepared ramekins or molds, filling them about 3/4 full.

  • Place the ramekins on a baking sheet and bake in the preheated oven for about 10-12 minutes. The edges should be set, but the center should still be soft and slightly jiggly.

  • Remove the baking sheet from the oven and let the fondants cool for a minute or two.

  • Carefully invert each ramekin onto a serving plate, gently tap the bottom, and lift the ramekin to release the fondant. The center should be gooey and flow out.

  • Dust with cocoa powder or powdered sugar, and serve immediately.

  • Enjoy the warm and indulgent chocolate fondants!

  • Note: The baking time may vary depending on your oven and the size of the ramekins. It's important to keep an eye on them to achieve the desired gooey center.

RECIPE 2 – CHERRY BERRY CHOCOLATE WHIPPED

Experience a burst of fruity flavors harmoniously combined with velvety chocolate in this delightful Cherry Berry Chocolate Whipped dessert. This recipe is a celebration of summer, bringing together the vibrant sweetness of cherries and berries with the decadence of smooth, whipped chocolate. Each spoonful is a symphony of textures and tastes, as the fluffy chocolate mousse envelops the juicy bursts of fresh fruit. Whether you're looking to impress guests at a dinner party or simply want to treat yourself to a luxurious dessert, Cherry Berry Chocolate Whipped is the perfect choice. Prepare to savor the enticing blend of flavors that will leave you craving for more. Get ready to indulge in a dessert that will whisk you away to a world of fruity-chocolate bliss.

Ingredients:

  • 1 cup heavy cream

  • 1/4 cup powdered sugar

  • 1/2 teaspoon vanilla extract

  • 1/4 cup dark chocolate, chopped

  • 1/2 cup cherries, pitted and halved

  • 1/2 cup mixed berries (such as strawberries, blueberries, and raspberries)

Instructions:

  • In a mixing bowl, combine the heavy cream, powdered sugar, and vanilla extract.

  • Using an electric mixer, beat the mixture on medium-high speed until soft peaks form.

  • Melt the dark chocolate in a microwave-safe bowl or using a double boiler.

  • Gradually add the melted chocolate to the whipped cream mixture, beating continuously until well combined and stiff peaks form.

  • Gently fold in the halved cherries and mixed berries, reserving a few for garnishing.

  • Spoon the cherry berry chocolate whipped dessert into serving glasses or bowls.

  • Garnish with the reserved berries on top.

  • Refrigerate for at least 1 hour to chill and set.

  • Serve the chilled dessert and enjoy the creamy, fruity, and chocolatey goodness!

  • Note: You can adjust the sweetness by adding more or less powdered sugar according to your taste preference. Feel free to experiment with different types of berries or add other toppings like shaved chocolate or chopped nuts for extra flavor and texture.


RECIPE 3 – DARK CHOCOLATE PUDDING WITH MALTED CREAM

Embrace the richness of dark chocolate and the velvety smoothness of malted cream in this indulgent Dark Chocolate Pudding with Malted Cream. This recipe takes the classic pudding to a new level, infusing it with the intense flavors of dark chocolate and the nostalgic charm of malted cream. The result is a dessert that is both comforting and sophisticated, with a perfect balance of sweetness and depth. The creamy, luscious pudding melts in your mouth, while the malted cream adds a delightful touch of complexity. Whether you're looking to satisfy your sweet tooth or impress your guests with a sophisticated dessert, Dark Chocolate Pudding with Malted Cream is a decadent choice. Prepare to immerse yourself in a world of chocolatey indulgence and creamy perfection. Get ready to delight in a dessert that will leave you longing for more with every heavenly spoonful.

Ingredients:

  • 2 cups whole milk

  • 1/4 cup granulated sugar

  • 2 tablespoons unsweetened cocoa powder

  • 2 tablespoons cornstarch

  • 1/4 teaspoon salt

  • 4 ounces dark chocolate, chopped

  • 1 teaspoon vanilla extract

  • Ingredients for Malted Cream:

  • 1 cup heavy cream

  • 2 tablespoons malted milk powder

  • 1 tablespoon powdered sugar

  • 1/2 teaspoon vanilla extract

Instructions:

  • In a medium saucepan, whisk together the milk, sugar, cocoa powder, cornstarch, and salt until well combined.

  • Place the saucepan over medium heat and cook, stirring constantly, until the mixture begins to thicken and bubble.

  • Reduce the heat to low and add the chopped dark chocolate. Stir continuously until the chocolate is fully melted and the pudding is smooth and thickened.

  • Remove the saucepan from heat and stir in the vanilla extract.

  • Transfer the pudding to individual serving bowls or ramekins.

  • Cover the surface of each pudding with plastic wrap to prevent a skin from forming.

  • Refrigerate for at least 2 hours or until the pudding is chilled and set.

Instructions for Malted Cream:

  • In a mixing bowl, combine the heavy cream, malted milk powder, powdered sugar, and vanilla extract.

  • Using an electric mixer, beat the mixture on medium-high speed until soft peaks form.

  • Serve the dark chocolate pudding with a dollop of malted cream on top.

  • Optionally, you can garnish with grated dark chocolate or cocoa powder.

  • Enjoy the luscious and rich combination of dark chocolate pudding and malted cream!

RECIPE 4 – CHOCOLATE KARANJI

Delve into the rich and irresistible flavors of India with the delightful Chocolate Karanji. This traditional sweet treat takes the beloved Karanji, a deep-fried pastry filled with sweet stuffing, and infuses it with a heavenly chocolate twist. The combination of crispy, golden pastry, and the luscious, gooey chocolate filling creates a dessert that is both familiar and excitingly decadent. The Chocolate Karanji is perfect for festive occasions or as a special indulgence for chocolate lovers. The aroma of cardamom and the richness of chocolate will fill your kitchen as you embark on a culinary journey that marries tradition with innovation. Prepare to savor the delicate balance of textures and flavors that will leave you craving for more. Get ready to experience a taste of India in every blissful bite of Chocolate Karanji.

  • 1 cup all-purpose flour (maida)

  • 2 tablespoons ghee (clarified butter)

  • Water, as needed

  • For the filling:

  • 1 cup grated dark chocolate

  • 1/2 cup desiccated coconut

  • 1/4 cup powdered sugar

  • 1/4 teaspoon cardamom powder

  • 2 tablespoons chopped nuts (almonds, cashews, pistachios)

  • Oil, for deep frying

  • For sealing:

  • 2 tablespoons all-purpose flour

  • Water, as needed

Instructions:

  • In a mixing bowl, combine all-purpose flour and ghee. Mix well until the ghee is evenly incorporated into the flour.

  • Gradually add water and knead the dough until it is smooth and firm.

  • Cover the dough with a damp cloth and let it rest for about 15-20 minutes.

  • In a separate bowl, mix grated dark chocolate, desiccated coconut, powdered sugar, cardamom powder, and chopped nuts to prepare the filling.

  • Divide the dough into small portions and roll each portion into a thin circle.

  • Place a spoonful of the chocolate filling in the center of each dough circle.

  • Fold the dough over the filling and seal the edges by pressing them together.

  • To make the sealing paste, mix all-purpose flour with water to form a thick paste.

  • Take a little of the sealing paste and apply it on the edges of the folded dough to secure the seal.

  • Trim off any excess dough using a cutter or knife to give it a neat shape.

  • Repeat with the remaining dough and filling.

  • Heat oil in a deep frying pan or kadai over medium heat.

  • Carefully slide the filled karanjis into the hot oil and fry them until they turn golden brown and crispy.

  • Remove the fried karanjis from the oil and drain them on a paper towel to remove excess oil.

  • Allow them to cool before serving.

  • Enjoy the delicious and decadent Chocolate Karanjis!

Ingredient Ideology | CULINARY DELIGHTS FROM GOA BY: DR. KAVIRAJ KHIALANI- CELEBRITY MASTER CHEF

Splendid, Serene & Sensual Specialities

Goa also known as the paradise on earth is one of the most popular vacation and leisure destinations of many staycations explorers is one place offering peace of mind, great ambiance, amazing foods, and lovely people! It is also one of the smallest states regarding population, Goa is one of the best destination places for tourists, the beauty of nature, beaches, culture, and festivals are popular in Goa. Therefore, Goa is not only famous for its beauty; it also serves a huge variety of Desserts.

Food has been one of the strong attractions in Goa for a number of tourists who love to have an array of fresh seafood varieties cooked to perfection in a great blend of spices be it live barbeque sessions, grills and roasts, the Goan style curries with steamed white rice, delicate and perfectly sweetened Goan sweets end the experience beyond expectations.

Here are a few of my all-time favorites with a twist from Goan Cuisine for all of you to try and relish!

Recipe-1] POTATO CHOPS

Ingredients:

Boiled mashed potatoes- 2 cups

Salt and pepper to taste

Chopped coriander leaves- 2 tbsp.

Breadcrumbs- ½ cup

Maida/cornflour as needed for coating and binding.

Eggs-2 no beaten, use maida-water paste for veg options.

For the stuffing various options can be used:

Scramble eggs + chopped ham/salami + cheese.

Assorted cooked mixed veggies + cheese

Oil to fry

To serve with- tomato ketchup & salad.

Method:

1. Prepare the ingredients for the chops.

2. In a mixing bowl combine together all ingredients one by one and prepare the mixture of potatoes for the chops/cutlets.

3. Choose a type of filling for the chops- veg or non-veg and stuff and shape them into oval type formats and dip them in egg and breadcrumbs or maida water paste and then breadcrumbs for veg.

4. Chill for 15-20 mins and then deep fry in medium hot oil until golden browned and remove excess oil on a kitchen towel and then serve it with ketchup, chutney, dips of your choice.

Recipe-2] CHICKEN VINDALOO

Ingredients:

Chicken- 750 gms curry cuts/med size pieces with bones and marinate with 1 tsp ginger- garlic paste, salt-1/4 tsp, and turmeric powder- ½ tsp mix well and keep aside for 20 mins.

For the Vindaloo Paste:

Oil/ghee- 2 tbsp.

Red chilies- 8-10 no.

Cloves-3-4, peppercorns- 8-10, cinnamon- 1-inch piece, cumin seeds- ½ tsp, garlic- 4-5 cloves, white vinegar- 1 tbsp. Mustard seeds-1/4 tsp, tomatoes- ½ cup chop.

For the Gravy

Oil- 2 tbsp.

Onions- 1 cup chop

Salt to taste

Water- ½ cup

Sugar-1/2 tsp

Coriander leaves- 2 tbsp.

Method:

1. Marinate the chicken and keep it aside.

2. Prepare the paste by slightly roasting the spices in a pan and combine all of it together in a grinder jar and blend it well to a smooth paste.

3. Heat oil add in onions and saute them until light brown and then add in the paste for a few seconds, add in the marinated chicken pieces and saute them well until oil starts leaving the sides in the pan.

4. Add in the salt, sugar, and water to cook the chicken pieces, add cubes of potato as well if desired with chicken, simmer, and cook for 12- 15 mins, serve hot garnished with coriander/chilies.

Recipe-3] GOAN STYLE PRAWN CURRY

Ingredients

Prawns- 500 – 700 gms cleaned and deveined

Water- with little salt to soak the prawns

For the masala:

Dried Kashmiri red chilies- 12-15 no

Garlic cloves- 6- 8 no

Peppercorns- ¾ tsp

Coriander seeds- 1 tbsp.

Cumin seeds- 1 tsp

Tamarind pulp- 1 tbsp.

Turmeric powder-1/2 tsp

Grated coconut- ¾th cup fresh preferred.

Coconut milk -1 and a half cup- use as needed.

For the curry:

Oil- 2 tbsp.

Ginger- 1 tbsp. chopped or paste

Onions- ½ cup chop

Tomatoes-1/2 cup chop.

Salt to taste

Curry leaves-10-12 no

Coriander leaves- 2 tbsp. chop

To serve with steamed white rice.

Method:

1. Clean the prawns and place them in salted water for 10 mins.

2. Lightly roast the ingredients for the paste and then combine into a mixer jar and grind to a smooth paste.

3. Heat oil in a pan add in the curry leaves, onions, and ginger, and cook them well for a few mins, add in the tomatoes, and curry paste and saute well.

4. Add prawns and thick freshly extracted coconut milk and allow them to simmer in the gravy for 12-15 mins, serve hot garnished with coriander leaves to go with steamed rice.

Recipe-4] SERRADURA SWEET

Ingredients:

Marie biscuits- 15-18 no crushed to a coarse powder.

Heavy cream- 3/4th cup

Vanilla custard- 1 cup

Condensed milk- ¼ cup

Vanilla essence- ½ tsp

Orange juice- ½ cup

Orange segments- ¼ cup

Peanut praline or chikki- 2 tbsp. crushed.

Assorted nuts of your choice- 2-3 tbsp.

White/ dark chocolate shavings- 2 tbsp.

Cherries/mint leaf/sprinklers to garnish

Method:

1. Prepare all the ingredients for the sweet, this is a Portuguese-influenced recipe in Goan Cuisine and is getting popular across various places.

2.We will need dessert bowls or small dessert glasses to layer this sweet dish.

3.In a mixing bowl combine together the custard, cream and condensed milk and start the layering with the cream mixture in the glass with a layer of crushed biscuits sprinkle little orange juice on them, add the praline, chocolate orange segments/chocolate and garnishes of your choice.

4.Layer and chill the glasses/bowls in the fridge for 3-4 hours and serve.